Sunday, 17 May 2020

DiscordRAT - Discord Remote Administration Tool Fully Written In Python


Discord Remote Administration Tool fully written in Python3.
This is a RAT controlled over Discord with over 20 post exploitation modules.

Disclaimer:
This tool is for educational use only, the author will not be held responsible for any misuse of this tool.
This is my first project on github as such this project is far from perfect , I will listen to any criticism as long as it is constructive.

Setup Guide:
You will first need to register a bot with the Discord developper portal and then add the bot to the server that you want. Once the bot is created copy the token of your bot and paste it at line 11.
Now on go on discord , go to the settings , go to appearance , scroll to the bottom , and activate "Developer Mode",now go to the server where your bot added right click on the channel where you want the bot to post , click copy ID and finally , paste the ID in the parenthesis in line 99.
Install requirements ("pip3 install -r requirements.txt")
Then if steps above were succesful after launching the python file, or executable , it will post a message on the server with a generated uuid , all that is left to do is posting "!interact " with the given uuid.
Now your bot should be available to use !
Requirements:
Python3,Windows
Compiling to exe (optional):
If you want to compile the bot to exe you can use PyInstaller.
Inside the directory of the bot execute "PyInstaller --onefile --noconsole DiscordRAT.py" or "python3 -m PyInstaller --onefile --noconsole DiscordRAT(NoCV).py (or DiscordRAT.py)"
If an error occured during compiling try to import the discord module "PyInstaller --onefile --noconsole --hidden-import=discord DiscordRAT.py"
Advice:
If you have problems with the installation of win32api or other modules , try installing it in a python virtual environment.
There are two python files one has opencv and webcam related modules the other does not, this has been done because open-cv adds multiple dozens of megabytes to the compiled .exe file.


via KitPloitRelated news

Saturday, 16 May 2020

Goddi (Go Dump Domain Info) - Dumps Active Directory Domain Information


Based on work from Scott Sutherland (@_nullbind), Antti Rantasaari, Eric Gruber (@egru), Will Schroeder (@harmj0y), and the PowerView authors.

Install
Use the executables in the releases section. If you want to build it yourself, make sure that your go environment is setup according to the Go setup doc. The goddi package also uses the below package.
go get gopkg.in/ldap.v2

Windows
Tested on Windows 10 and 8.1 (go1.10 windows/amd64).

Linux
Tested on Kali Linux (go1.10 linux/amd64).
  • umount, mount, and cifs-utils need to be installed for mapping a share for GetGPP
apt-get update
apt-get install -y mount cifs-utils
  • make sure nothing is mounted at /mnt/goddi/
  • make sure to run with sudo

Run
When run, will default to using TLS (tls.Client method) over 636. On Linux, make sure to run with sudo.
  • username: Target user. Required parameter.
  • password: Target user's password. Required parameter.
  • domain: Full domain name. Required parameter.
  • dc: DC to target. Can be either an IP or full hostname. Required parameter.
  • startTLS: Use to StartTLS over 389.
  • unsafe: Use for a plaintext connection.
PS C:\Users\Administrator\Desktop> .\godditest-windows-amd64.exe -username=testuser -password="testpass!" -domain="test.local" -dc="dc.test.local" -unsafe
[i] Begin PLAINTEXT LDAP connection to 'dc.test.local'...
[i] PLAINTEXT LDAP connection to 'dc.test.local' successful...
[i] Begin BIND...
[i] BIND with 'testuser' successful...
[i] Begin dump domain info...
[i] Domain Trusts: 1 found
[i] Domain Controllers: 1 found
[i] Users: 12 found
[*] Warning: keyword 'pass' found!
[*] Warning: keyword 'fall' found!
[i] Domain Admins: 4 users found
[i] Enterprise Admins: 1 users found
[i] Forest Admins: 0 users found
[i] Locked Users: 0 found
[i] Disabled Users: 2 found
[i] Groups: 45 found
[i] Domain Sites: 1 found
[i] Domain Subnets: 0 found
[i] Domain Computers: 17 found
[i] Deligated Users: 0 found
[i] Users with passwords not set to expire: 6 found
[i] Machine Accounts with passwords older than 45 days: 18 found
[i] Domain OUs: 8 found
[i] Domain Account Policy found
[i] Domain GPOs: 7 found
[i] FSMO Roles: 3 found
[i] SPNs: 122 found
[i] LAPS passwords: 0 found
[i] GPP enumeration starting. This can take a bit...
[i] GPP passwords: 7 found
[i] CSVs written to 'csv' directory in C:\Users\Administrator\Desktop
[i] Execution took 1.4217256s...
[i] Exiting...

Functionality
StartTLS and TLS (tls.Client func) connections supported. Connections over TLS are default. All output goes to CSVs and are created in /csv/ in the current working directory. Dumps:
  • Domain users. Also searches Description for keywords and prints to a seperate csv ex. "Password" was found in the domain user description.
  • Users in priveleged user groups (DA, EA, FA).
  • Users with passwords not set to expire.
  • User accounts that have been locked or disabled.
  • Machine accounts with passwords older than 45 days.
  • Domain Computers.
  • Domain Controllers.
  • Sites and Subnets.
  • SPNs and includes csv flag if domain admin (a flag to note SPNs that are DAs in the SPN CSV output).
  • Trusted domain relationships.
  • Domain Groups.
  • Domain OUs.
  • Domain Account Policy.
  • Domain deligation users.
  • Domain GPOs.
  • Domain FSMO roles.
  • LAPS passwords.
  • GPP passwords. On Windows, defaults to mapping Q. If used, will try another mapping until success R, S, etc... On Linux, /mnt/goddi is used.


More info


DalFox (Finder Of XSS) - Parameter Analysis And XSS Scanning Tool Based On Golang


Finder Of XSS, and Dal is the Korean pronunciation of moon.

What is DalFox
Just, XSS Scanning and Parameter Analysis tool. I previously developed XSpear, a ruby-based XSS tool, and this time, a full change occurred during the process of porting with golang!!! and created it as a new project. The basic concept is to analyze parameters, find XSS, and verify them based on DOM Parser.
I talk about naming. Dal(달) is the Korean pronunciation of moon and fox was made into Fox(Find Of XSS).

Key features
  • Paramter Analysis (find reflected parameter, find free/bad characters, Identification of injection point)
  • Static Analysis (Check Bad-header like CSP, X-Frame-optiopns, etc.. with base request/response base)
  • Optimization query of payloads
    • Check the injection point through abstraction and generated the fit payload.
    • Eliminate unnecessary payloads based on badchar
  • XSS Scanning and DOM Base Verifying
  • All test payloads(build-in, your custom/blind) are tested in parallel with the encoder.
    • Support to Double URL Encoder
    • Support to HTML Hex Encoder
  • Friendly Pipeline (single url, from file, from IO)
  • And the various options required for the testing :D
    • built-in / custom grepping for find other vulnerability
    • if you found, after action
    • etc..

How to Install
There are a total of three ways to Personally, I recommend go install.

Developer version (go-get or go-install)
go-install
  1. clone this repo
$ git clone https://github.com/hahwul/dalfox
  1. install in cloned dalfox path
$ go install
  1. using dalfox
$ ~/go/bin/dalfox
go-get
  1. go get dalfox!
$ go get -u github.com/hahwul/dalfox
  1. using dalfox
$ ~/go/bin/dalfox

Release version
  1. Open latest release page https://github.com/hahwul/dalfox/releases/latest
  2. Download file Download and extract the file that fits your OS.
  3. You can put it in the execution directory and use it. e.g
$ cp dalfox /usr/bin/

Usage
    _..._    .' .::::.   __   _   _    ___ _ __ __   :  :::::::: |  \ / \ | |  | __/ \\ V /   :  :::::::: | o ) o || |_ | _( o )) (   '. '::::::' |__/|_n_||___||_| \_//_n_\     '-.::''  Parameter Analysis and XSS Scanning tool based on golang  Finder Of XSS and Dal is the Korean pronunciation of moon. @hahwul      Usage:    dalfox [command]    Available Commands:    file        Use file mode(targets list or rawdata)    help        Help about any command    pipe        Use pipeline mode    url         Use single target mode    version     Show version    Flags:    -b, --blind string            Add your blind xss (e.g -b https://hahwul.xss.ht)        --config string           Using config from file    -C, --cookie string           Add custom cookie        --custom-payload string   Add custom payloads from file    -d, --data string             Using POST Method and add Body data        --delay int               Milliseconds between send to same host (1000==1s)        --found-action string     If found weak/vuln, action(cmd) to next        --grep string             Using custom grepping file (e.g --grep ./samples/sample_grep.json)    -H, --header string           Add custom headers    -h, --help                    help for dalfox        --only-discovery          Only testing parameter analysis    -o, --output string           Write to output file        --output-format string    -o/--output 's format (txt/json/xml)    -p, --param string            Only testing selected parameters        --proxy string            Send all request to proxy server (e.g --proxy http://127.0.0.1:8080)        --silence                 Not printing all logs        --timeout int             Second of timeout (default 10)        --user-agent string       Add custom UserAgent    -w, --worker int              Number of worker (default 40)  
    _..._
.' .::::. __ _ _ ___ _ __ __
: :::::::: | \ / \ | | | __/ \\ V /
: :::::::: | o ) o || |_ | _( o )) (
'. '::::::' |__/|_n_||___||_| \_//_n_\
'-.::''
Parameter Analysis and XSS Scanning tool based on golang
Finder Of XSS and Dal is the Korean pronunciation of moon. @hahwul


Usage:
dalfox [command]

Available Commands:
file Use file mode(targets list or rawdata)
help Help about any command
pipe Use pipeline mode
url Use single target mode
version Show version

Flags:
-b, --blind string Add your blind xss (e.g -b https://hahwul.xss.ht)
--config string Using config from file
-C, --cookie string Add custom cookie
--custom-payload string Add custom payloads from file
-d, --data string Using POST Method and add Body data
--delay int Milliseconds between send to same host (1000==1s)
--found-action string If found weak/vuln, action(cmd) to next
--grep string Using custom grepping file (e.g --grep ./samples/sample_grep.json)
-H, --header string Add custom headers
-h, --help help for dalfox
--only-discovery Only testing parameter analysis
-o, --output string Write to output file
--output-format string -o/--output 's format (txt/json/xml)
-p, --param string Only testing selected parameters
--proxy string Send all request to proxy server (e.g --proxy http://127.0.0.1:8080)
--silence Not printing all logs
--timeout int Second of timeout (default 10)
--user-agent string Add custom UserAgent
-w, --worker int Number of worker (default 40)
Single target mode
$ dalfox url http://testphp.vulnweb.com/listproducts.php\?cat\=123\&artist\=123\&asdf\=ff -b https://hahwul.xss.ht  
Multiple target mode from file
$ dalfox file urls_file --custom-payload ./mypayloads.txt  
Pipeline mode
$ cat urls_file | dalfox pipe -H "AuthToken: bbadsfkasdfadsf87"  
Other tips, See wiki for detailed instructions!

ScreenShot


via KitPloit

Related links


  1. Machine Learning Hacking
  2. Hacking Quotes
  3. Viral Hacking

HOW TO CAPTURE SCREENSHOT IN KALI LINUX? – KALI LINUX TUTORIAL

Kali Linux has been the most advanced penetration testing machine introduced yet. It has the most valuable tools used for every sort of hacking. To take advantage of Kali Linux hacking tools, you have to switch your OS to Kali Linux. You can either install Kali Linux as your default OS or just install as a virtual machine within the same OS. You can learn more about how to install Kali Linux Virtualbox. Today in this tutorial, I am just going to share a very simple Kali Linux tutorial on how to capture screenshot in Kali Linux. It's very simple and newbie friendly.

SO, HOW TO CAPTURE SCREENSHOT IN KALI LINUX? – KALI LINUX TUTORIAL

There are two ways to capture a screenshot in Kali Linux. One is the ultimate easy one and the second one is a bit complex but it's also not so complicated. So, don't worry about anything.

INSTRUCTIONS TO FOLLOW

  • In a first way, you can take a screenshot in a similar way as you take in Windows OS by simply clicking the PrntScr button on the keyboard. As you hit that button, a screenshot will be saved in the Pictures folder of your Kali Linux. The major problem with it, it only captures the full screen. We have no control over it to capture a specific window or region.
  • The second way is to take a screenshot using the command. For that, open up a terminal in the Kali Linux and type apt-get install ImageMagick.
  • Once the command is completed and ImageMagick is installed. We have two options to take a screenshot with it. One is to capture full screen and second is to capture a specific window.
  • To capture full screen, type import -window root Pictures/AnyNameOfTheImage.png in the terminal. It will take a full screenshot and will save it to the Pictures directory by the name you specify. Make sure to type .png  at the end of the file name.
  • To take a screenshot of a specific window or region, type import Pictures/AnyNameOfTheImage.png in the terminal and hit Enter, it will turn the cursor to a selection tool. You just click the mouse button and select the area you want to capture. As you will leave the mouse key, screenshot will be saved in the Pictures folder.
That's all how you can capture screenshot in Kali Linux. This is a very simple and beginner-friendly Kali Linux tutorial to help out all the newbies how they can use this features in need. Hope it will be useful for you.
Related articles

Friday, 15 May 2020

15 Important Run Commands Every Windows User Should Know

There are several ways to efficiently access the files, folders, and programs in Windows operating system. We can create shortcuts, pin programs to the taskbar, Start menu shortcuts etc. but we can't do it for all programs in many cases. However, the Windows Run Command box is one of the most efficient ways of accessing system programs, folders, and settings.

In this article, I am going to share 15 most important Run commands for Windows users. These commands can make it easier to manage a lot of tasks.
How to open Windows Run command box?
You need to press Win+R (Hold Windows button then Press R)

Important Run Commands Every Windows User Should Know

1. %temp%
This is the fastest way to clear the temporary files from your computer. It can save a lot of space which was being wasted by temporary files.
2. cmd 
This command will open the windows DOS command prompt. Windows command prompt is very useful for performing many tasks which are not possible using graphical user interface.
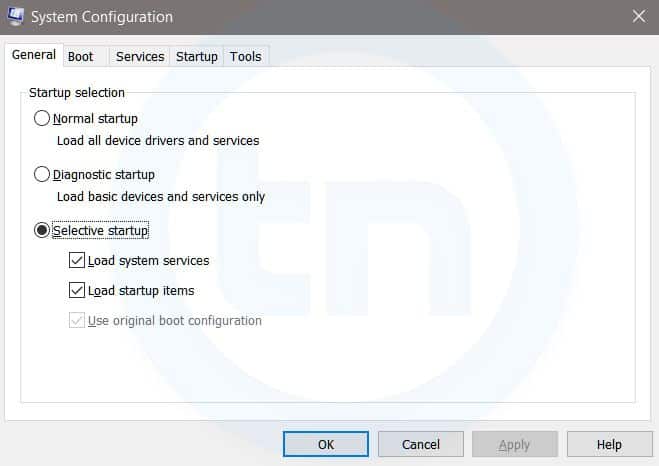
3. MSConfig
Windows Run Command - MSconfig-compressed
Windows System Configuration
This command will open Windows System Configuration where you can edit different things like the boot options, startup options, services, etc.
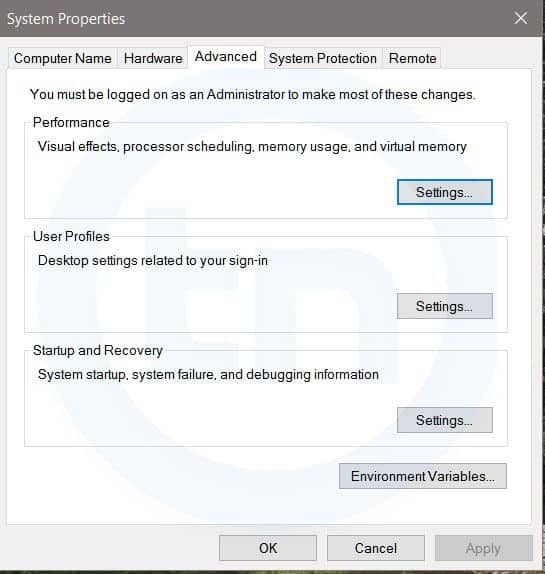
4. sysdm.cpl
Windows Run Command - sysdm cpl-compressed
System Properties window
This command will open the System Properties window, Where you can change the system protection and performance related many settings
5. Powershell
Powershell is very similar the command prompt. Just type this command in the Run dialog box, and you will have your PowerShell opened without administrator privileges.
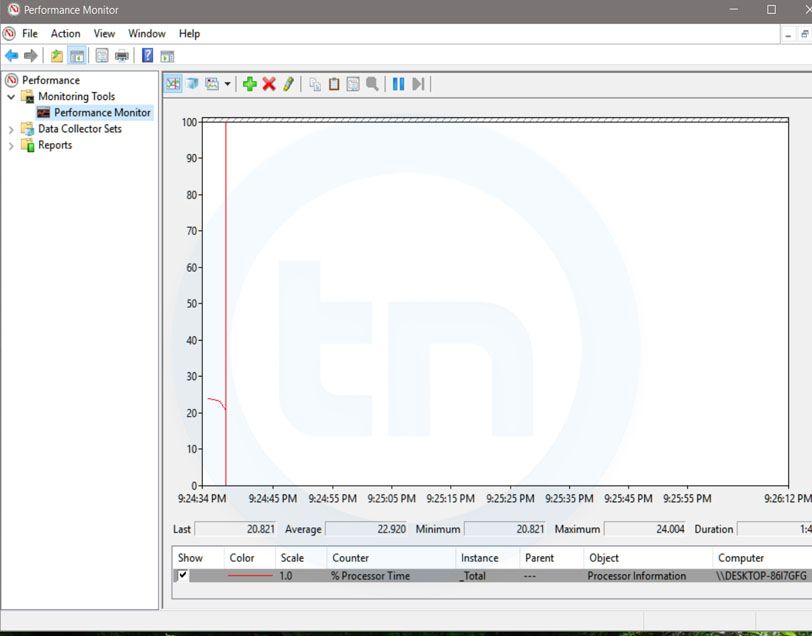
6. perfmon.msc
Windows Run Command - perfmon msc-compressed
Windows System Performance monitor
This command can be used to monitor the performance of your computer. There are plenty of options for monitoring the system performance
7. regedit
Regedit Run command is used to open the Windows Registry. It is a hierarchical database that hosts all the configurations and settings of Windows operating system, it's users and the installed software.
8. \ (Backslash)
This is one of the lesser known Run commands. Just enter the backslash into the Run dialog box and it will open up the C drive. It is one of the quickest ways to access the C drive.
9. . (Dot)
This is yet another lesser known Run command. When executed, it opens the current user's home folder which hosts all the other local folders like the Downloads, Documents, Desktop, Pictures, etc.
10. .. (Double Dots)
When you execute these two dots in the Run dialog box, it will open up the Users folder which is located directly on the C drive
11. Control
This command will open the control panel. Control panel is used for managing all the system settings and programs
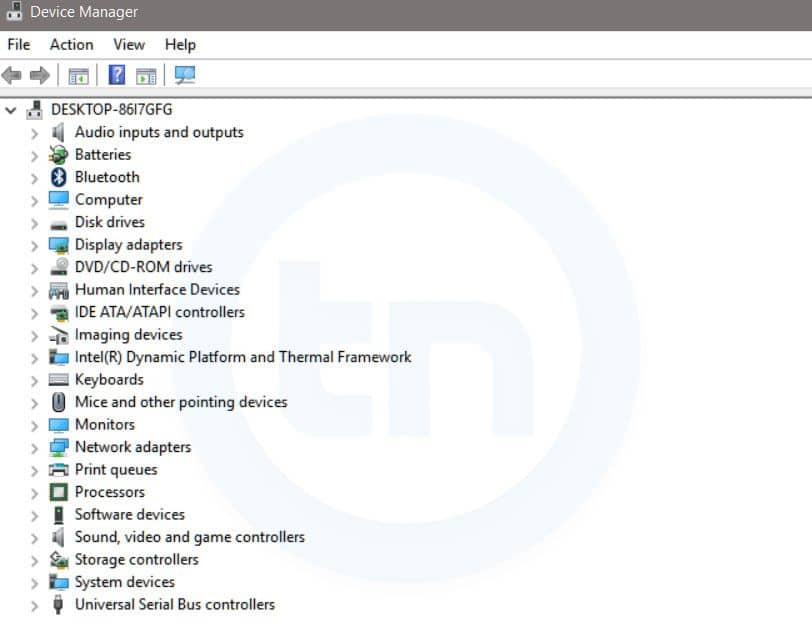
12. hdwwiz.cpl
Windows Run Command - hdwwiz-
Windows Device Manager
This command is used to open the Device Manager in Windows. You can manage all the device connected internally or externally to your PC.
13. Notepad
The quickest way to open notepad in Windows. Just type this command in Run Box and hit enter.
14. osk
This command will open On-Screen Keyboard on your display monitor. You can easily touch and type or use your mouse for typing.
15. taskmgr 
This command will open task manager where you can manage all the processes and programs running on Windows Operating system.
Related articles

Thursday, 14 May 2020

Hacktronian: All In One Hacking Tools Installer For Linux And Android

Hacktronian Installation
   Termux users must install Python and Git first: pkg install git python
   Then enter these commands:
   You can watch the full installation tutorial here:


Hacktronian Menu:
  • Information Gathering
  • Password Attacks
  • Wireless Testing
  • Exploitation Tools
  • Sniffing & Spoofing
  • Web Hacking
  • Private Web Hacking
  • Post Exploitation
  • Install The HACKTRONIAN
Information Gathering menu:
Password Attacks menu:
Wireless Testing menu:
Exploitation Tools menu:
  • ATSCAN
  • SQLMap
  • Shellnoob
  • commix
  • FTP Auto Bypass
  • jboss-autopwn
Sniffing and Spoofing menu:
Web Hacking menu:
  • Drupal Hacking
  • Inurlbr
  • Wordpress & Joomla Scanner
  • Gravity Form Scanner
  • File Upload Checker
  • Wordpress Exploit Scanner
  • Wordpress Plugins Scanner
  • Shell and Directory Finder
  • Joomla! 1.5 - 3.4.5 remote code execution
  • Vbulletin 5.X remote code execution
  • BruteX - Automatically brute force all services running on a target
  • Arachni - Web Application Security Scanner Framework
Private Web Hacking:
  • Get all websites
  • Get joomla websites
  • Get wordpress websites
  • Control Panel Finder
  • Zip Files Finder
  • Upload File Finder
  • Get server users
  • SQli Scanner
  • Ports Scan (range of ports)
  • ports Scan (common ports)
  • Get server Info
  • Bypass Cloudflare
Post Exploitation:
  • Shell Checker
  • POET
  • Weeman
Hacktronian's License: MIT Licence

That's It... If You Like This Repo. Please Share This With Your Friends. And Don't Forget To Follow The Author At Twitter, Instagram, Github & SUBSCRIBE His YouTube Channel!!!

Thank you. Keep Visiting.. Enjoy.!!! :)

Related articles


How To Run Online Kali Linux Free And Any Devices

Read more


  1. Hacking Etico Curso Gratis
  2. Start Hacking
  3. Clases De Hacker
  4. Tools For Hacking Wifi